Email Templates #
The Notifications Page in the App allows you to customize and manage the emails sent to customers for various booking-related events. You can enable or disable different types of emails and edit their templates according to your preferences. Here’s a detailed guide on how to utilize the Notifications Page:
Types of Emails: #
The app offers five types of emails that can be customized to suit your business needs:
1. New booking confirmation:
This email is sent to customers to confirm their appointment booking.
2. New booking reminder:
This email serves as a reminder to customers about their upcoming appointment, sent two days prior to the scheduled date.
3. Thank you and Review request:
This email is automatically sent to customers as a follow-up after one hour of making a booking.
4. New booking canceled:
This email is sent to customers when their appointment is canceled.
5. New booking rescheduled:
This email is sent to customers when their appointment is rescheduled.
Enabling/Disabling Email Types: #
On the Email Page, you will find a list of emails along with a toggle switch to enable or disable each type. By enabling an email type, you ensure that it will be sent to customers for the corresponding event. Likewise, disabling an email type will prevent it from being sent.
To manage the email types:
Step 1: From the app admin page > click Notifications.
Step 2: In Notification > Look for the list of emails with their corresponding toggle switches.
Step 3: Enable or disable each email type as per your requirements.
Step 4: Save the changes to apply the updated settings
Editing Email Templates: #
To customize the content of each email template, follow these steps:
Step 1: From the app admin page > click Notifications.
Step 2: In Notifications> Look for the list of emails with their corresponding Edit button.
Step 3: Click the Edit button.
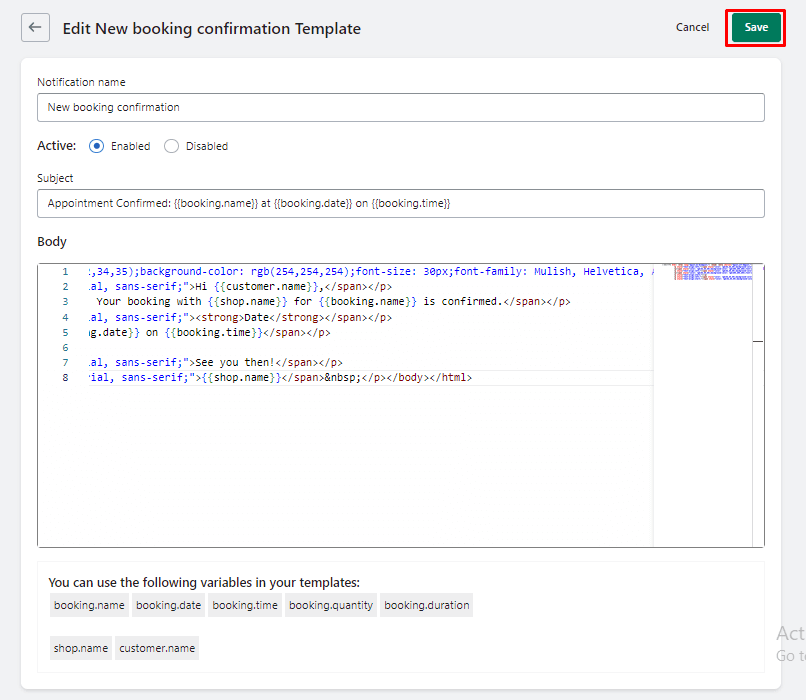
Within this section, you will find the following options for editing the email template:
Notification Name:
This field allows you to provide a name or title for the email notification. It helps you identify the email template easily.
Status:
Here, you can select whether the email template is active or inactive. An active template will be used for sending emails, while an inactive template will not be used.
Subject:
Enter the subject line of the email. You can use the available variables (mentioned below) to personalize the subject according to each customer’s booking details.
Body:
Customize the email’s main content or body. You can utilize the available variables (mentioned below) to dynamically populate the email with relevant information.
Step 3: Click the Save button to update the email template.
Available Variables:
To personalize the email subject or body, you can utilize the following variables:
booking.name:
The name of the customer who made the booking.
booking.date:
The date of the appointment.
booking.time:
The time of the appointment.
booking.quantity:
The number of bookings or appointments made.
booking.duration:
The duration of the appointment.
shop.name:
The name of your Shopify store.
customer.name:
The name of the customer receiving the email.


